To create a new project:
·
Run the application with one of the
above-mentioned methods.
·
If a previous project loaded automatically on
start up, press New Project button on the toolbar, menu File
→
New Project or press simultaneously Ctrl + N.
·
Use menu File
→ Open
Source XML or press Ctrl + X to select an
XML file (it must be a well formed XML document). After XML file is successfully
loaded its schema will be shown in the XML tree view.
·
Click on empty space of the page in Layout
to set the required properties in Object Properties:
o
Specify Pattern property in a property
grid. Pattern property should contain valid XPath of XML element with
current page data. Note: XPath expression is case sensitive.
o
Set BackgroundPath property value to
the valid full path of previously prepared PDF file. That contains a form you
want to fill with data from XML. It can be easily done by clicking button (…).
o
You can also set an alternative value to
RasterizedPath property. Set it to the valid full path of previously prepared
raster file with a form you want to fill with data from XML.
Note. Currently application supports
the following raster image
formats: PNG, TIFF, JPG, GIF (for more details, see XEP reference)
After a project is created data fields
can be added, modified or removed.
Data field
is a frame on the Layout. It is rendered in the
resulting document “dynamically” getting data from XML data file.
To add new data fields follow these
steps:
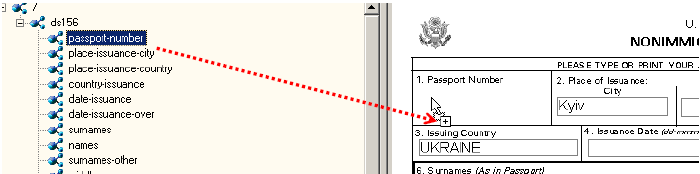
·
Select a node in the XML Tree
View. The data stored in this node will be rendered in the resulting
form.
·
Press Add to Layout
tool bar button to add a field with selected content to the design layout. Also
you may simply drag a selected tree node and drop it on the Layout. You
will see a new frame appeared in a form layout.
·
You can now select
the newly added frame by left
clicking on it and set a desired position by dragging it over the layout area.
·
You can resize the frame by clicking on a small
rectangle in the lower corner of the frame and dragging it.
·
Additional properties can be modified for a
selected data field in the Object properties.
·
After all data fields added and aligned, you
can generate a stylesheet and/or a PDF document.
·
During the PDF rendering such field will
be filled
up with data from XML file.
See detailed
properties description in the “General Data field properties description”.
See flash-movie: How to
Add Text Field
See flash-movie: How to
Add Check Mark
See flash-movie: How
to Add Barcode Field
See flash-movie: How
to Add Image Field
The application makes possible to insert a special field into your project. On the step of generating XSL stylesheet
they will be transformed into XSL parameters. It enables a user to set some values at XSL transformation stage.
Special fields are
described in format-plugin.xml (it is created in %ProgramFiles%/VisualXSL/XSL
subfolder of application folder). Just drag and drop XML node from XML tree view
to the layout to insert the one. Change the value of XPathValue property in its object
properties to the name of a desired field (see list below). The name should be
specified with preceding symbol “$”.
|
Field name |
Description |
Default value |
|
PrintDate |
Date when project is transformed
last time |
Current date |
|
CreateDate |
Date when project is created |
None |
|
AuthorName |
Name of the project author |
None |
|
CompanyName |
Name of the author’s company
|
None |
A user can also insert custom special
field, which will be later transformed into stylesheet parameter. In this case
XPathValue should be set to “$<special-name>”. Where special-name is CName
(satisfies standard XSL demands of variable naming). Set default value of the
parameter
by changing Text property.
The application makes possible to apply
additional formatting to the field content. Currently only different date formats
are implemented. The date value in source XML file should be properly specified in ISO8601
format (yyyy-mm-ddThh:mm:ss:mmm) or ODBC canonical format (yyyy-mm-dd hh:mi:ss).
Select field containing correct date
value for applying formatting. Switch to its object properties; choose value
Date for DataType property. Then specify format code for DataFormat
property (all supported
format codes listed in the table below). To refresh data field view (and see
updated formatting of data field) click Refresh button.
Date format codes
|
Code |
Description |
|
without century |
with century |
|
0 or 100 |
Default mon dd yyyy hh:miAM (or
PM) |
|
1 |
101 |
USA mm/dd/yy
|
|
2 |
102 |
ANSI yy.mm.dd
|
|
3 |
103 |
British/French dd/mm/yy
|
|
4 |
104 |
German dd.mm.yy
|
|
5 |
105 |
Italian dd-mm-yy
|
|
6 |
106 |
dd mon yy
|
|
7 |
107 |
Mon dd, yy
|
|
8 |
108 |
hh:mm:ss
|
|
9 or 109 |
Default + milliseconds mon dd
yyyy hh:mi:ss:mmmAM (or PM) |
|
10 |
110 |
USA mm-dd-yy
|
|
11 |
111 |
JAPAN yy/mm/dd
|
|
12 |
112 |
ISO yymmdd
|
|
13 or 113 |
Europe default + milliseconds dd
mon yyyy hh:mm:ss:mmm(24h) |
|
14 |
114 |
- hh:mi:ss:mmm(24h)
|
|
20 or 120 |
ODBC canonical yyyy-mm-dd
hh:mi:ss(24h) |
|
21 or 121 |
ODBC canonical (with
milliseconds) yyyy-mm-dd hh:mi:ss.mmm(24h) |
|
- |
126 |
ISO8601
yyyy-mm-ddThh:mm:ss:mmm(no spaces) |
Milliseconds (if they are specified in
XML data for a field) will not be rendered after the layout being refreshed, but will
be rendered
in the resulting PDF document.
The application provides wizard for adding
address labels to the document. The resulting label will be aligned vertically to
the bottom of the label and will consist of 4 or 5 address lines. There are three areas in
the wizard dialog (see the figure below). The first one is a tree
representing the first element from the XML source file (further XML tree). The second
is a group of textboxes for address parts. And the third one (placed right down
the second one) is a sort of preview for the address label. A user can add data from
XML tree to textboxes by double click on tree node, by dragging nodes into or by
clicking Add >> button.
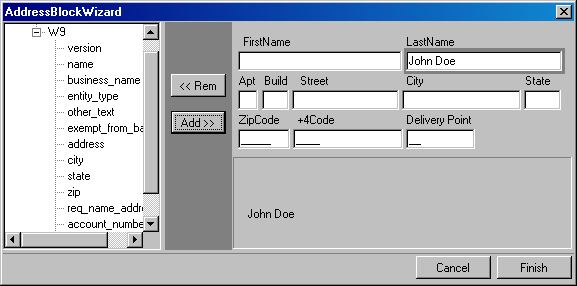
In case
a user clicks Add >> button
data will be added to the highlighted textbox. When a user tries to add new data to
the textbox that already contains some text, the new data will replace the
previous one. And vice versa, by clicking << Rem button the textbox can be cleared.
The data
added from XML tree in such a way will be inserted into the resulting document
dynamically. Also a user can type in some static data if needed.
The application forms the PostNet barcode from 3
last textboxes. It assumes that all data entered into them are numeric, so
please make sure that XML data represents a proper number for post code.
Note.
Currently the application has no option to specify fonts to be used in document
formatting. So a user should manually edit the configuration file for XEP and add
a section to describe PostNet True Type font.
Example.
Let’s assume that XEPWin is installed to
folder “C:\Program Files\RenderX\XEPWin”.
·
Open XEP.xml file from subfolder “xep”.
·
Find XML element <font-group/> with attribute
@label=”Windows TrueType”.
·
Add the following text inside the found
element:
<font-family name="IDAutomationSPOSTNET"
embed="true">
<font><font-data ttf="IDAutomationSPOSTNET.ttf"/></font>
</font-family>
That
makes possible for XEP formatter to
use True Type font for Postnet barcodes rendering.
See flash-movie: How
to Add Address Label
The application has a ability to put some
paragraphs with different formatting properties into one block-container.
Example of such a block-container is an address block. The main advantage of such
a feature is possibility to prepare text blocks using XML data of variable length
(so there is no possibility to leave blank for a data field). Also it may
be helpful when different formatting should be applied to different parts of one
paragraph.
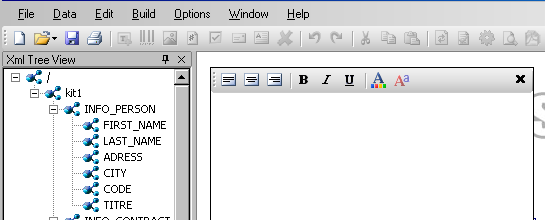
Initially, when
a user adds a paragraph block
to the project (from Data -> Add Paragraph menu) it has no paragraphs
and will not be rendered in the preview or the resulted document. A user should select Edit –> Edit
Para from the menu to add paragraph or to edit existing ones inside the
block. This will bring up the following view:
A user can type in static text there, drag
and drop nodes with data from XML tree or type the XPath expression inside curly
brackets. To apply formatting to the text select it and click the appropriate
toolbar button.
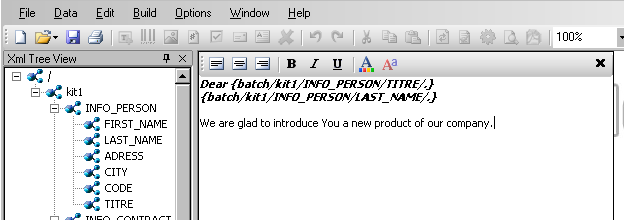
To finish editing
of the paragraph select
Edit -> Finish Editing Para or click toolbar button with cross.
Formatting of the text is limited by control possibilities that’s why most of XSL-FO
features are inaccessible (that situation will be improved in the next application
version).
Caution!
Before editing a paragraph block a user should ensure that the
whole block on the design layout is visible to them. In other case, a user will have to
scroll design layout manually to see all text being edited. Undo/redo is not supported while user
is editing the paragraph block.
Copy/Paste commands are standard Windows
clipboard commands. The application allows to Copy/Cut a single data field or a
whole page and then Paste it into the same or another instance of the application
several times.
·
Copy takes
selected data field (or page) to the clipboard.
·
Cut moves
selected data field (or page) to the clipboard (removing it from the layout).
·
Paste inserts
previously copied/cut data field (or page) into the layout.
Caution! Please make sure that the new pasted data field has
correct XPath expression (you can do it by selecting Build->Validate(F6)) or
by clicking the appropriate toolbar button.
Almost all actions can be rolled
back using Undo command. A user can trace changes by doing Undo (and
Redo action vice versa).
There are some specifics about this
feature:
·
All changes made to the data field, while it is
still selected are considered as one, so Undo/Redo will treat them as a
single action. To have possibility to undo a particular change of data field
change selection before doing it.
All operations concerning adding or removing pages can not
be undone.
In order to create a multi-page form,
follow these steps:
·
Create a new project.
·
Select an XML file using menu File
→
Open Source XML or by pressing Ctrl + X.
·
In the object properties set BackgroundPath
property to a full path to the PDF file with several pages used as the background.
You can use a button (...) to open the file using dialog. After a PDF background
is selected you will see the first page rendered in the layout area and a full
path to a rasterized version will appear in object properties in
RasterizedPath property. Also the application produces rasterized version of
the PDF file page in the project folder named: PdfFileNameXXXX.png,
where XXXX is a page number starting from 0001. Those files are set
as backgrounds for the corresponding pages.
·
If you do not have a PDF file with a form, but
a TIFF file (or other supported graphics format) instead, you may set its path
to RasterizedPath property manually.
·
Now you can add and adjust data fields for this
page (see “How to add data fields in Visual-XSL (VisualXSL)”
section).
·
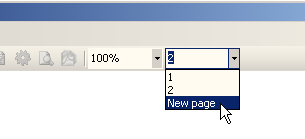
When all data fields added and properly
adjusted click the toolbar combobox with the active page number. You will see
currently available pages numbers so there is a command New Page at the
bottom of the drop down list. Click it every time you need to add a new page to
the project or use Edit
→ Add
Page
menu or press Alt + P key combination.
To remove
the currently selected page use Edit → Remove
Page menu or press Alt + R key combination.
In order to fill in paper forms with
data fields follow these steps:
·
Do the following:
o
Create your own project in
Visual-XSL (VisualXSL).
o
Add data fields.
o
Add all necessary pages.
o
Use menu Options
→
Preferences, clear the checkbox Render Form
Background.
o
Save .VXL file;
·
Now
a user can generate the PDF-file with data
and print it over the paper form(s).
To restore the background rendering in the destination
document, the checkbox should be checked back
The log window allows tracing the
formatting progress. It contains all the messages from the XEP formatting
engine. The messages are highlighted as follows:
·
errors – red;
·
warnings – blue;
·
others - gray.
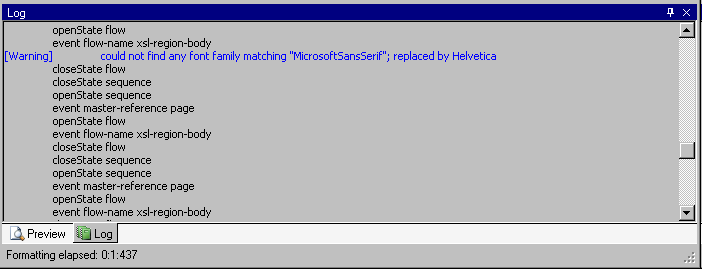
It will be
helpful to take a look at the log after each
document formatting. It is especially important if the document is not generated
successfully because the log can show the reason of the error.
After a project is created and all
necessary data fields are placed on the layout:
·
Press Create Document toolbar button or
use main menu command Build
→ Create
Document. A file save dialog will appear.
·
Type in file name for your document, set a
desired document format (PDF or PostScript) and press Ok.
Note. The application automatically rasterizes PDF into image, in case of PostScript being generated and PDF file is
set as the background for the project. This raster image is used as the background in
the document.
·
The
document generation can take time
depending on the number of pages and the form complexity.
Note.
If an XML file contains a lot of records, a user may get an error “Not enough
memory to format”. To fix this issue a user has to increase Java memory settings
(-Xms and –Xmx keys) for Cliser Service (part of XEPWin package used by
Visual-XSL (VisualXSL)). See Cliser Service Documentation for details.
If the number of pages is more than this setting can
handle, see “How to create documents faster with XEP and XSL stylesheet made
with
Visual-XSL (VisualXSL)” section of this manual for the solution.
Creating of documents with
Visual-XSL (VisualXSL) is
acceptable if a user needs to generate a small number of pages of some simple form
(1-100 pages). However, if a user needs to generate thousands of pages in resulting
document with some complex form, it will be much faster to use XEP directly. To
do that:
·
Create a document layout as described above.
·
Use Generate XSL command to generate XSL
stylesheet.
Use XEP to perform the formatting of document file.
Any other XSL transformer (like Saxon or MS XML) can be used to apply the stylesheet to the XML. Then
a user has to use RenderX XEP formatter with the
acquired XSL-FO (XSLFO) file to get the PDF file.
Visual-XSL (VisualXSL) has a command line interface
that gives an access to the application functionality from the Windows console.
The syntax is:
VisualXSL.exe <VisualXSLProject.vxl> <SourceXml.xml>
<ResultingFile.pdf | ResultingFile.ps> [options]
<VisualXSLProject.vxl>
is the full path to Visual-XSL (VisualXSL) application pre-designed project file.
<SourceXml.xml>
is the full path to the source XML file, containing data for using in the
transformation.
<ResultingFile.pdf | ResultingFile.ps>
is the full path to the resulting PDF or PS file name.
Note. If
the path contains spaces, it should be enclosed with double quotes.
The [options] are:
-? -
displays a message box with the help on the command line syntax.
-lFULLPATH
- sets the log file name to store messages of the formatting process, where
FULLPATH is a file name with full path.
-rNUMBER
– sets the number of records to be extracted from an XML file to perform
generation of the document. Where NUMBER equals to the expected number of
records.
Example.
The following command line shows this feature in action:
VisualXSL.exe “%ALLUSERSPROFILE%\Documents\VisualXSL
Projects\Samples\W9\W9.vxl"
“%ALLUSERSPROFILE%\Documents\VisualXSL
Projects\Samples\W9src.xml”
“%ALLUSERSPROFILE%\Documents\VisualXSL
Projects\Samples\W9\W9.pdf” –l”%
ALLUSERSPROFILE%\Documents\VisualXSL
Projects\Samples\W9\W9.log” –r5
Note.
%ALLUSERSPROFILE%
is a Windows system variable that
contains the path to the all users' profile folder.
This example will use a sample
W9.vxl
project file with only 5 records from
W9src.xml
to produce
W9.pdf,
in …\All
Users\Documents\VisualXSL Projects\Samples\W9\
folder, and log all the events to
W9.log
file
located in the same folder.
Visual-XSL (VisualXSL) has an option for generating PDF form from existing project. To create PDF form you should have designed a valid project. A PDF form can be created for project having all page background set to PDF file only. The produced PDF form will look similar to project preview and will have fillable textboxes and checkboxes generated from corresponding fields. Any other fields used in
Visual-XSL (VisualXSL) project will be ignored.
Follow these steps:
·
Design your project (see sections "Create your own project" for details).
·
Insure that all pages have PDF background and the project is saved.
·
Use menu Build
→ Create PDF Form to produce the fillable PDF form.
In case of success an application will inform you where created form is located.
Note.
Visual-XSL (VisualXSL) application works with non-encrypted PDF only.